You’ve found a place you want to visit. Now you need to find the right location, choose a route, and work out where to get on and off.
Naver Map helps with those everyday decisions. This guide explains how to use it in English, with a worked example from Seoul Station to Gyeongbokgung Palace.
The screenshots use the Android app in English. Your screen may look slightly different depending on your phone and app version. Journey times, arrivals, and fares shown here are examples, not fixed travel information.
Quick answer
Before your first journey:
- Set Naver Map to English.
- Find your destination and check its address.
- Tap To and confirm your starting point.
- Choose public transport or walking.
- Open a route and check the boarding point, transfers, and final walk.
Keep your hotel’s Korean name and address somewhere easy to find, too.
1. Set Naver Map to English
Install NAVER Maps, Navigation, published by NAVER, from your phone’s app store.
Android
Open Naver Map and follow:
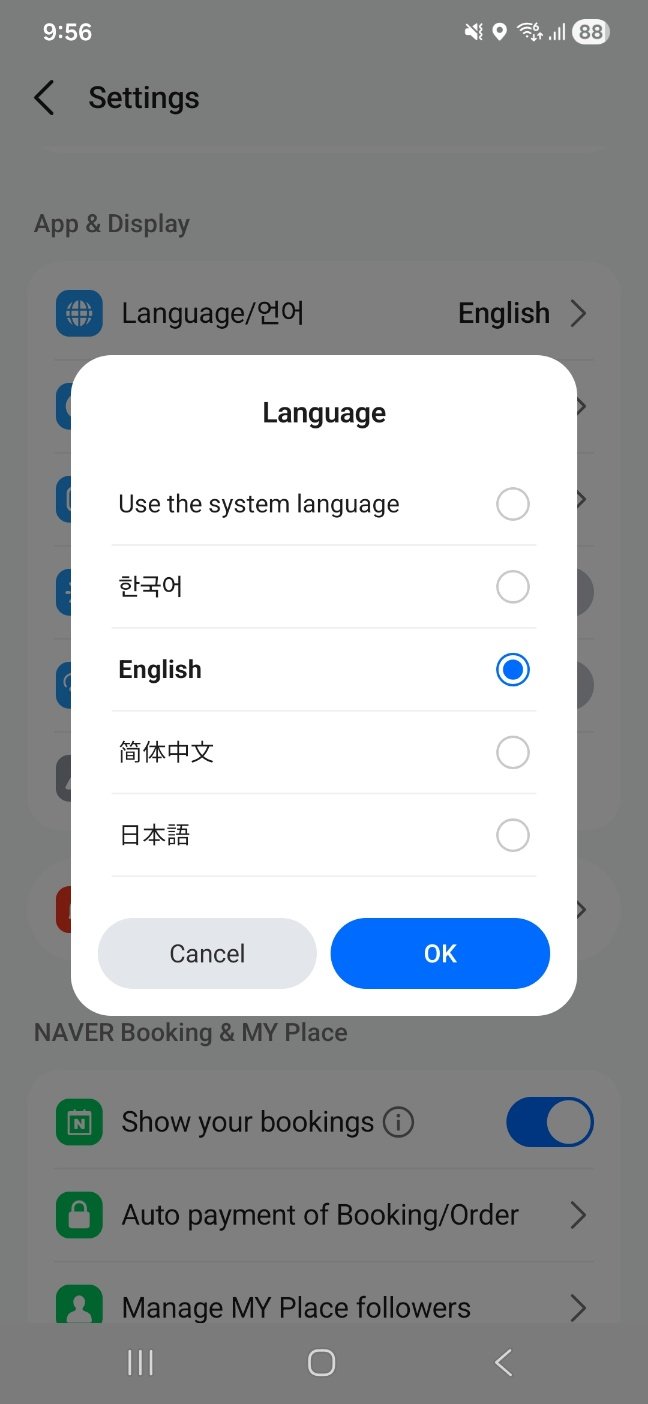
MY → Settings → Language/언어 → English → OK
The MY profile icon is beside the search bar. Inside MY, look for the settings gear.
iPhone
Open MY → Settings → Language. This takes you to your iPhone’s language settings for Naver Map.
If the language option is missing, Naver advises adding a supported language under Settings → General → Language & Region first.
See Naver’s official language-setting instructions if your screen differs. The help page is in Korean; use browser translation if needed.
2. Find the place—and check the address
Search for your hotel, restaurant, or attraction by name.
Open the result and check the address before starting directions. For a hotel, compare it with your booking confirmation. For a restaurant or café, make sure you have the right branch.
In our example, the place page shows Gyeongbokgung Palace, with its address below the photos.
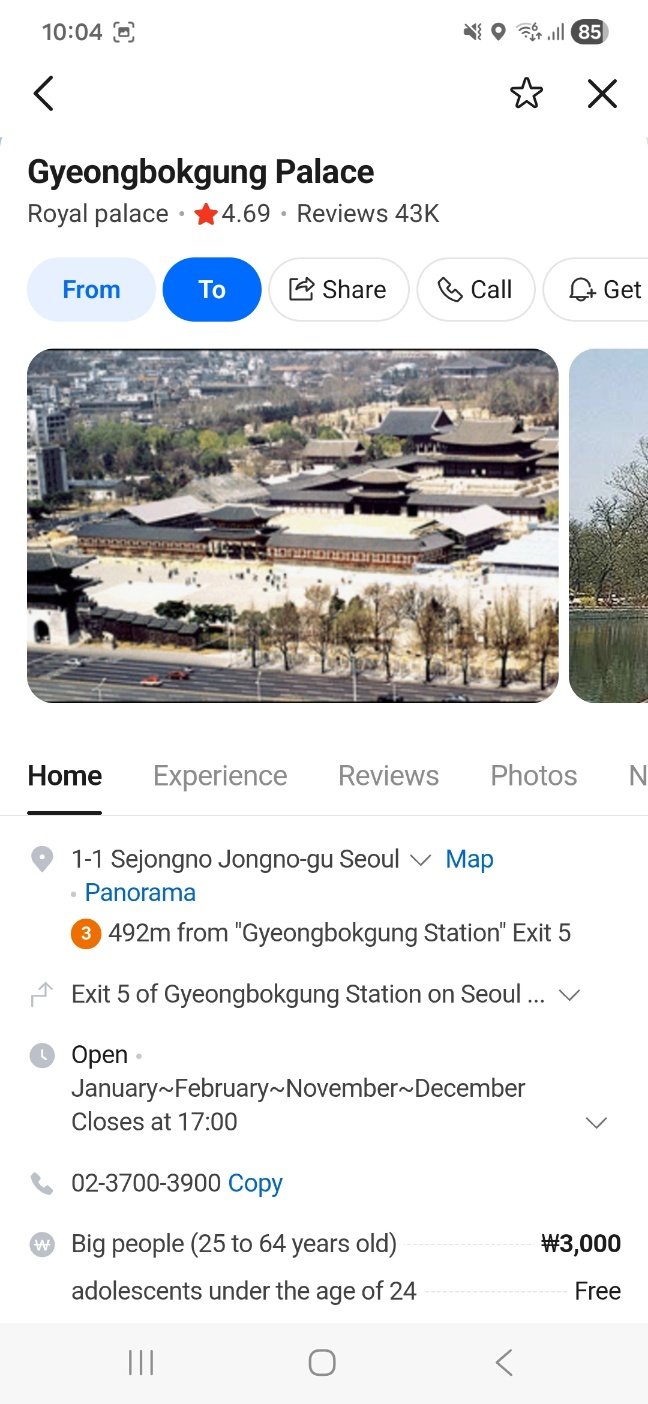
The main buttons are:
- From: use this place as your starting point.
- To: use this place as your destination.
- Share: share the place link.
- Star icon: save the place.
If an English search doesn’t find it
Try copying the Korean name or street address from your booking confirmation or the business’s own website.
If the business provides a direct Naver Map link, use that.
Avoid translating a business name word by word and assuming the translation is its listed name. Copying the original Korean text gives you a better starting point.
English settings don’t make every detail clear
Some place descriptions may still contain Korean or awkward translations.
Check the venue’s official information for details that could affect your visit, especially closing days, last admission, seasonal hours, and ticket conditions.
3. Save your hotel—or keep its details in your notes
To save a place, open its page and tap the star icon. Follow the prompts to add it to a saved list.
Naver requires you to sign in to use its saved-place feature.
You don’t need a complicated collection. Start with your hotel and a few places you already plan to visit.
If you don’t want to sign in
Use Share to copy the place link into your phone’s notes. Keep these details alongside it:
- Hotel name in Korean
- Full Korean address
- Phone number
A screenshot of the address is another useful backup. Remember that a screenshot cannot update your route or show your live position.
4. Set your starting point
On your destination’s place page, tap To.
Check the starting-point field before comparing routes. If you’re already nearby, your current location may be appropriate. If you’re planning from your hotel—or from another country—enter the intended departure point manually.
For this example, the starting point is the Seoul Station Line 1 location, and the destination is Gyeongbokgung Palace.
The exact starting point matters. A subway entrance, a railway concourse, and a nearby bus stop are different places, even when they share the same station name.
5. Compare public transport routes
Select the public transport icon at the top. In these screenshots, it looks like a bus.
That icon opens public transport directions, not just bus routes. Underneath it, you can choose:
- All
- Bus
- Subway
- Bus+Subway
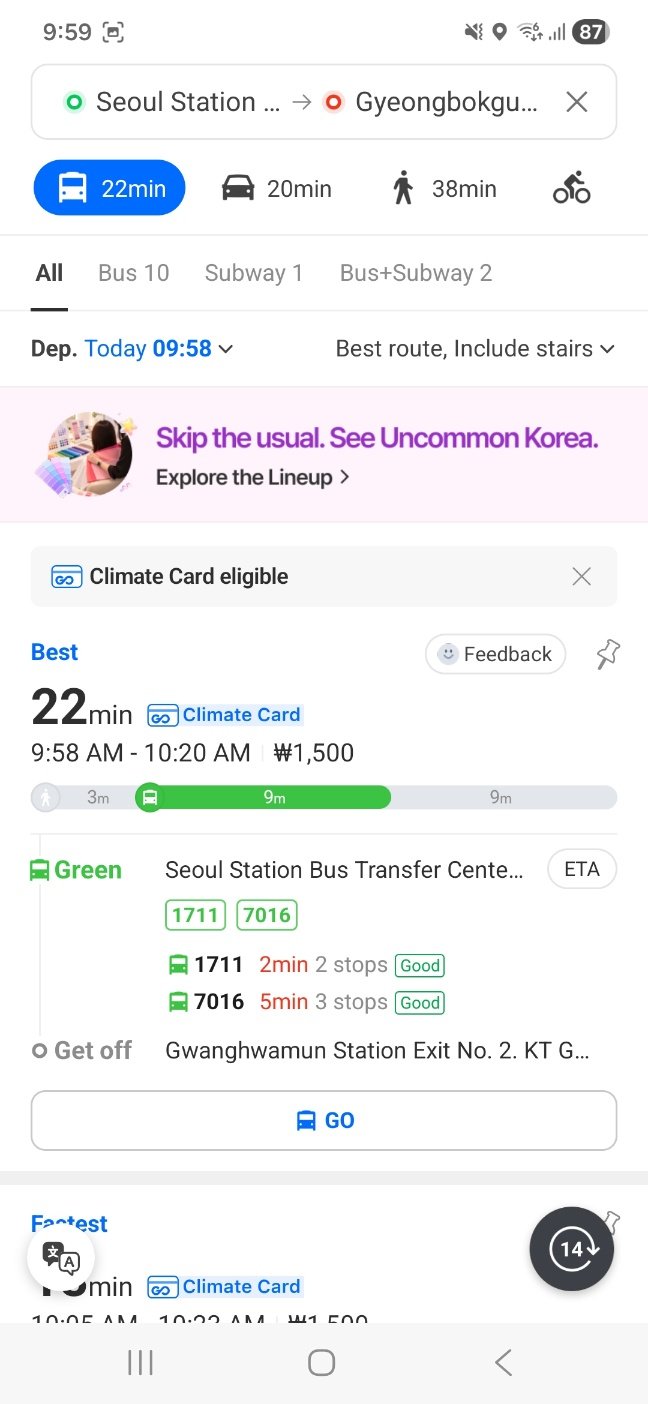
Check the departure date and time shown beside Dep. as well. A route planned for the morning may not be suitable late at night.
What does the large journey time mean?
The 22min shown in this example is the estimated journey time for the whole route. It is not 22 minutes spent on the bus.
The route includes walking to the stop, taking the bus, and walking from the final stop to the palace.
Best is not always fastest
The app labels one route Best, while another option is marked Fastest.
Before choosing, compare:
- Total journey time
- Number of transfers
- Walking before and after the ride
- Whether the route suits your luggage and mobility needs
Song’s Local Note
With a suitcase, I’d look at the walking and transfers before choosing the shortest time. A few extra minutes can be worth it for a simpler journey.
6. Open the route and check where to board
Tap a route card to open its details.
In our example, the route starts with a 163-metre walk, estimated at 3 minutes, to Seoul Station Bus Transfer Center, Platform 7.
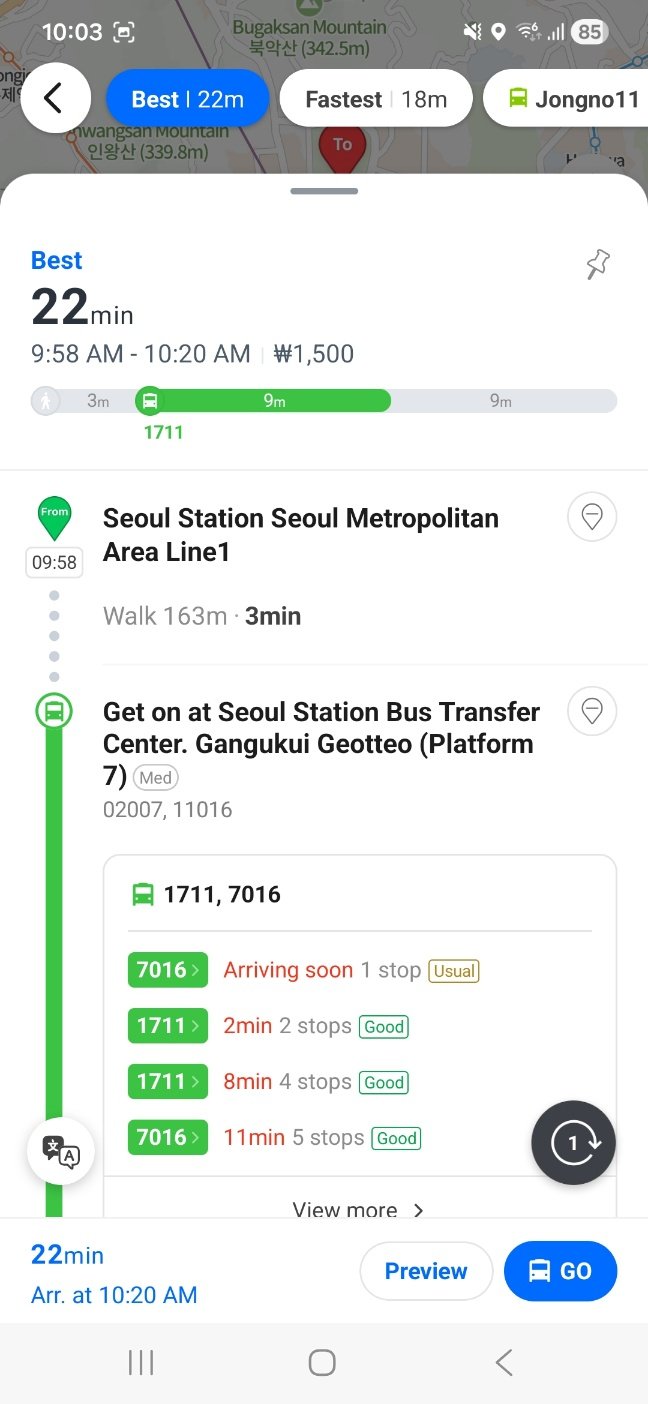
Look for the words Get on at. This is your boarding point.
At a large station or bus interchange, check the platform information as well as the stop name. Being near the right station does not necessarily mean you’re waiting at the right stop.
Do I take both buses listed?
The example lists 1711, 7016 together for this bus segment.
These are alternatives for the segment shown. It does not mean you should take one and then transfer to the other.
Check the selected route and direction before boarding.
What does “2min 2 stops” mean?
In the arrival list, 2min 2 stops means the approaching bus is estimated to reach your boarding stop in two minutes and is currently two stops away.
It does not mean you should get off after two stops.
You may also see Arriving soon instead of a number of minutes. Arrival information changes, so check it again when you reach the stop.
7. Check where to get off—and the walk afterward
Scroll farther down the route.
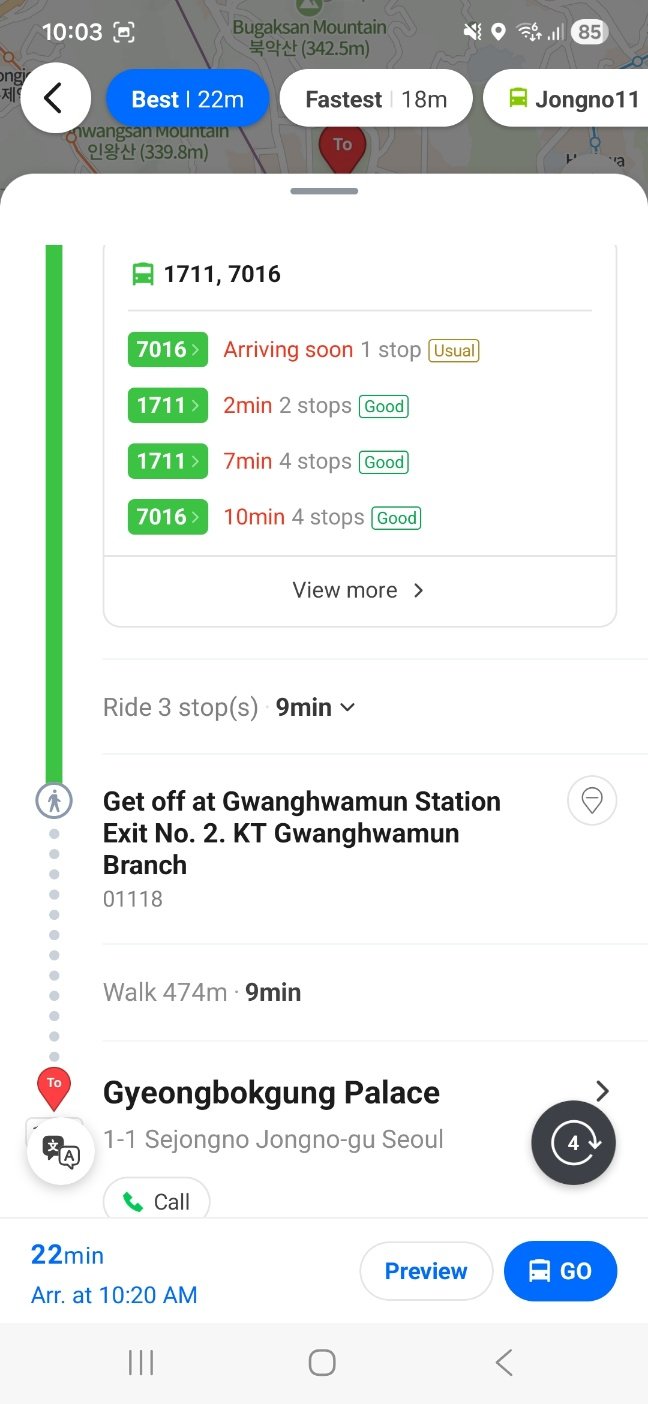
The example shows:
Ride 3 stop(s) · 9min
This describes the ride after boarding: three stops, with an estimated travel time of nine minutes.
That is different from the “2 stops” beside an approaching bus in the arrival list.
Next, look for Get off at. Here, it shows:
Gwanghwamun Station Exit No. 2. KT Gwanghwamun Branch
Although the stop name includes “Station Exit No. 2,” this is the bus stop where the route tells you to get off. It is not an instruction to enter the subway.
The route then shows Walk 474m · 9min to Gyeongbokgung Palace.
Check this last section before boarding. Getting off the bus does not always put you directly outside your destination.
8. Use walking directions
For a walking journey, select the person walking icon at the top.
The example from Seoul Station to Gyeongbokgung Palace shows:
- Best: 38 minutes
- Easy: 39 minutes
- Avoid stairs: 39 minutes
These are the estimates in the screenshot; yours may differ.
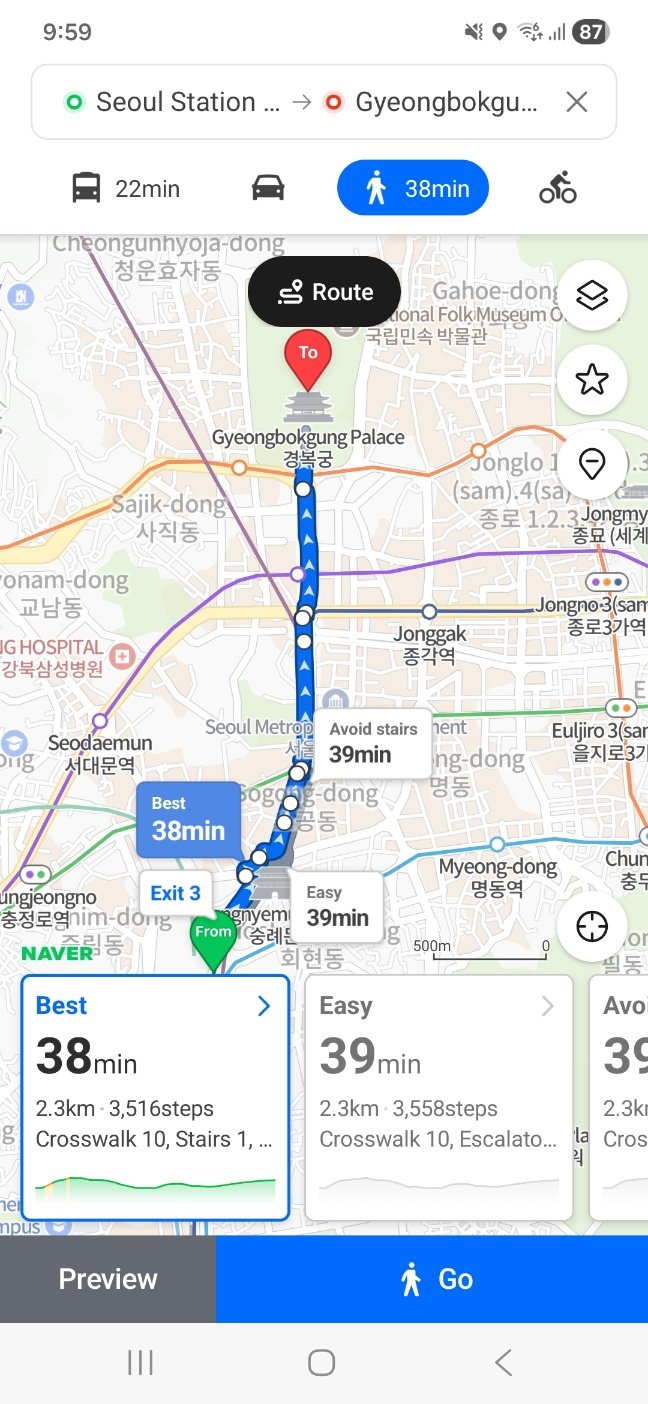
You can use Preview to inspect the route before setting off, or Go to start walking guidance.
If stairs matter to you, inspect the route details and the Avoid stairs option. Don’t assume that a route labelled Easy is step-free.
An avoid-stairs option is also not a guarantee of full wheelchair accessibility. Check entrances, lifts, and conditions on the ground where necessary.
When you reach the destination pin, you may still need to find the correct entrance or floor.
Common problems
I can’t find the place
Try the Korean name or full address. Check the city and branch, and use a direct map link from the business if one is available.
My route starts somewhere unexpected
Check the starting-point field. Replace it with the hotel, station, or other location you actually intend to leave from.
I can’t save a place
Check whether you’re signed in. If you prefer to do that later, keep the place link and Korean address in your phone’s notes.
The journey looks complicated
Compare the transfers and walking distance. The fastest option may not be the one you find easiest to follow.
The time or fare has changed
Search again before departure. Arrival estimates, traffic, schedules, and fares can change.
For a last departure or a service that needs a reservation, check the transport operator’s current information too.
Before you head out
Make sure you have:
- The correct destination and branch
- The correct starting point
- The right travel mode
- Your boarding and alighting points
- The final walking route
- Your hotel address for the journey back
Try planning one journey before your trip. Once you can read the route from beginning to end, the app becomes much easier to use when you’re outside.
Related guides
Sources and screenshot notes
This guide uses Naver’s official help pages and English-language Android screenshots supplied for Korea by Song. The route example explains how to read the app; it is not a report of a journey travelled.
Official references below are in Korean. Use browser translation if needed.
- App language settings
- Setting a starting point and destination
- Saving places
- Public transport route options
- Public transport fare information
- Walking directions
Official help pages checked: October 21, 2026.
Anything still unclear?
If a step doesn’t match your screen, email me with your phone type and the part that caused trouble. Please leave personal details out of any screenshots.
1 thought on “How to Use Naver Map in Korea: A First-Time Visitor’s Guide”
Comments are closed.